
I really stressed over the removal my CJ engine – no UNDERSTATEMENT I completely freaked out about it!! It is impossible to complete most major servicing tasks with the engine still in the van – it just has to come out! So if you actually want to drive one of these suckers you need to grow a pair and get over it. My engine was literally pissing oil out everywhere, the guy who dropped the van off thought it might be an oil/petrol mix (he discovered this by licking his fingers after wiping them in a puddle of oil on the driveway and tasting it!!!). To somebody who has never done a teardown before, everything seemed daunting about this procedure! I must have spent at least 5 nights just researching the best way of lowering the thing, let alone getting it out, inspected and pulled apart. In the end it was all very easy – don’t know why I was so worried about the whole process. Just take your time, meticulously label everything, give it a bit of welly and follow Ratwell’s guide (this was an absolute life saver y the way!).
Note: My T2 has a 2 litre long block engine. It is almost impossible to move this thing by yourself. You probably could lower it easy enough but it is extremely heavy. So unless you are going to get all Lee Merino – get a friend to help you get it onto the engine stand!
I have to stress the importance of preparation when it cam to removing the engine. I had a friend visit from Ireland so I spent a good while sourcing and buying all of the relevant kit to make removing the engine as simple as possible. I didn’t want either of us trying to prop up 200Kg with a knee whilst the other was scurrying around looking for some blocks of wood to prop the thing up. after researching there seems to be 3 methods of getting the engine out:
- Jacking the vehicle up to a height where the engine could easily be slid out of the rear (remember you cannot remove the rear section of the chassis on a late bay, like the split vans!). This is achieved by building a lattice of wood like a funeral pyre (doesn’t bode well!). Then once unbolted remove pieces of wood until the engine is on a board and can be slid out on the floor.
- Unbolting everything that holds the engine in place and jacking the vehicle up, this way the jack does all the work. Nice!
- The same as method 1, but instead of wood use a platform type jack to lower the engine. Now, I have a motorbike inspection stand that worked perfectly (this is also mentioned in the Ratwell guide).
I found either beg, borrowing or stealing the following made this process of removal very easy:
- 4 axle stands, you re going to need extended height stands, I used Draper AS6000 stands which were 870mm in height. They are around £130 a pair. Very sturdy and will probably last me a life time. You are going to need a jack that gets the vehicle to this height to use them though. mine didn’t – back to wooden blocks!
- High reach trolley jack – see above. Probably not recommended by the H&S lads but a couple of concrete blocks to go underneath them to raise the vehicle high enough. Hold your breath when you do this!!!
- Platform jack – I used the one I have for my motorbike – but can be purchased for around £200 on eBay.
- Tyre – I placed this on the platform jack above just to give the engine a bit of love!!
- Relevant Sockets etc to remove said nuts.
- A lot of tape or labels to mark up all of your cables.
- A tonne of plastic bags for all of the bits you remove – be very anal about this!!!! You are not going to save the planet with the amount you use especially when you start to tear the engine down.
- A camera to take as many pictures as you can. A good reference for the rebuild and as bonus you can bask in your glory on your very own website – mmmmmm!
- A first aid kit for when you completely skin your shins trying to kick it off the transmission!
- A 24 pack of Guinness to celebrate like an idiot at the end of the removal and toast your mechanical genius!
SO WHAT NOW???
So, I could post all of my instructions and pictures on how I went about getting the engine out but to be honest this has been covered expertly by Ratwell, who’s guide I followed to the letter. Follow this and you CANNOT FAIL in the engine removal. Link to the guide below:
http://ratwell.com/technical/EngineRemoval.html
A GREAT MANY THANKS Mr ATWELL – YOU ARE A VW T2 GENIUS!
Once you have your engine out of the van, you should have something like the below. It is at this point you realise you are probably not going to be driving any time soon and your bank account is going to take a major hit in getting this back up and running!
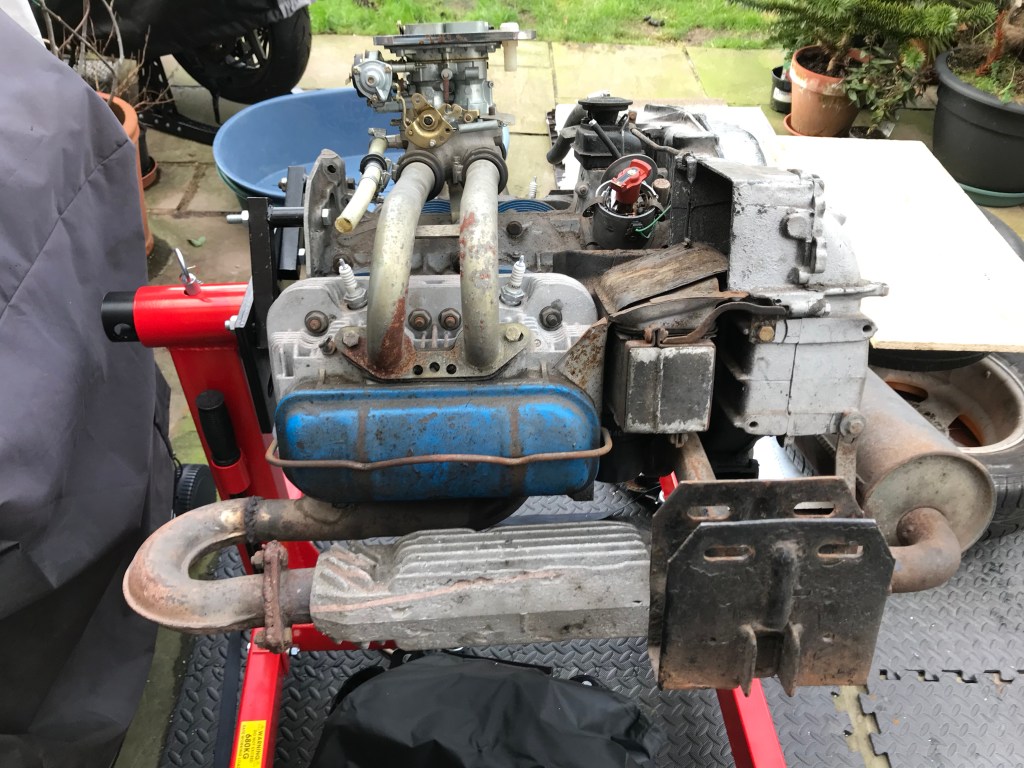
THE TEARDOWN – It is no coincidence the word tear is in the word teardown, you will be shedding an awful lot of them!!
- To start with I removed the clutch and flywheel just so I could get the engine on the stand. This is simple enough and just requires the removal of a few bolts and a bit of gumption to separate the items. It is advised that if you wish to reuse your clutch you should avoid touching it with greasy hands. I only read this after the fact but was planning on changing the clutch anyway (its only a £100 replacement). Once out I de-rusted my flywheel and sealed and stored away with the bolts, shims and 5 hole washer.
- I then removed the heat exchangers and exhaust. Having never seen one of these engines before I didn’t initially realise that the exhaust is not correct nor did I know what heat exchangers were or that they were separate items to the exhaust! As you can probably make out in the picture you can see that the previous owner had welded these two items together. You might also notice that the H/E’s are not intact. Both items went to the scrapyard. A word of caution, to replace the H/E’s it is going to cost you about £600 (yep!!!) and to find second hand ones on Ebay for the CJ engine is almost impossible (I did find one that was just about in working order). On another note, if you actually want to use the HX’s for heating your van prepare yourself for a long, long trawl to find all of the parts you need.
- The next item removed was the Carb. Easy enough, just 4 bolts – 2 on each side. Having done a little research most of the bolts I removed should have been studs (they were fastidiously replaced on the rebuild). Picture above showing the current state of the Carb. Lot of rust and the rubber gaskets had failed. That being said, I had managed to turn the engine over a few times before teardown so have assumed this item working. I will provide a separate article on servicing these once I have found out what sort it actually is!!
- The next item I removed was the engine support bar. Again only 4 bolts (or in my case 2!!!). The bar should then pull off. Only surface rust on this, so no replacement just a powder coat to give it a bit of love!
- The next thing I removed was the Alternator or Generator, again, very easy to do. Undo top bolt and release the tension from the fan belt. Remove fan belt and throw away (unless you are a tight arse!). If you remove this bolt ensure you label and keep, mine was a weird shape that I’m guessing stops this slipping.

- Fan removal
- Fan shroud
- Tinware
- Thermostat
- Oil cooler
