
Today begins my first real work on the van – a full inspection and repair of the brakes. Having spent hours looking through the Haynes Manual and a few well noted websites I decided that this might offer me my first ‘little victory’ in VW T2 repair – WHO WAS I KIDDING!
IDIOT WARNING: If you are foolish enough to be using this as a reference please note that this is the first time that I have ever changed or altered the braking system of any vehicle (besides my Raleigh Grifter in 1984). It will be some time before we run the van by the MOT fella – so wait out before you decide if anything I do here is of note.
Background: I picked up the van from a lovely couple in Mold, Wales. They had experienced brake trouble, it had been checked by the mechanic, but something still not right. The day I arranged the transporter, I attempted a drive onto the flatbed, let rip down the driveway onto the road, I put my foot on the brake pedal and stopped about 25 metres later after applying the handbrake, well at least I think it was the handbrake I also aimed at large ginger tom cat (felt a bump and still feel the guilt!). Changed pants, and decided this would be the first job to fix on the van!
Initial Inspection (the big reveal): So, jacked Chucky up, put him on my newly purchased axle stands and had a prod:
- Girlfriend presses foot pedal – I can still rotate both front wheels – mmmmm.
- Engaged handbrake – I can still rotate both rear wheels – bugger!
- Inspected brake lines and joints for signs of breakage and leaks. So, the hose from the fluid reservoir (under passenger seat) was perished (FAULT 1). Line from the T-Section to the Master Cylinder cracked (FAULT 2) and all nuts rounded (obviously no brake line spanner used!) (FAULT 3). Sign of leaking brake fluid Off-Side hose to copper line (FAULT 4). Signs of fluid at all joints at rear (FAULT 5,6,7,8). THIS IS NOT GOOD!
- Handbrake cable loose – if not for the leaks might even solve the rear brake issues????? (FAULT 9).
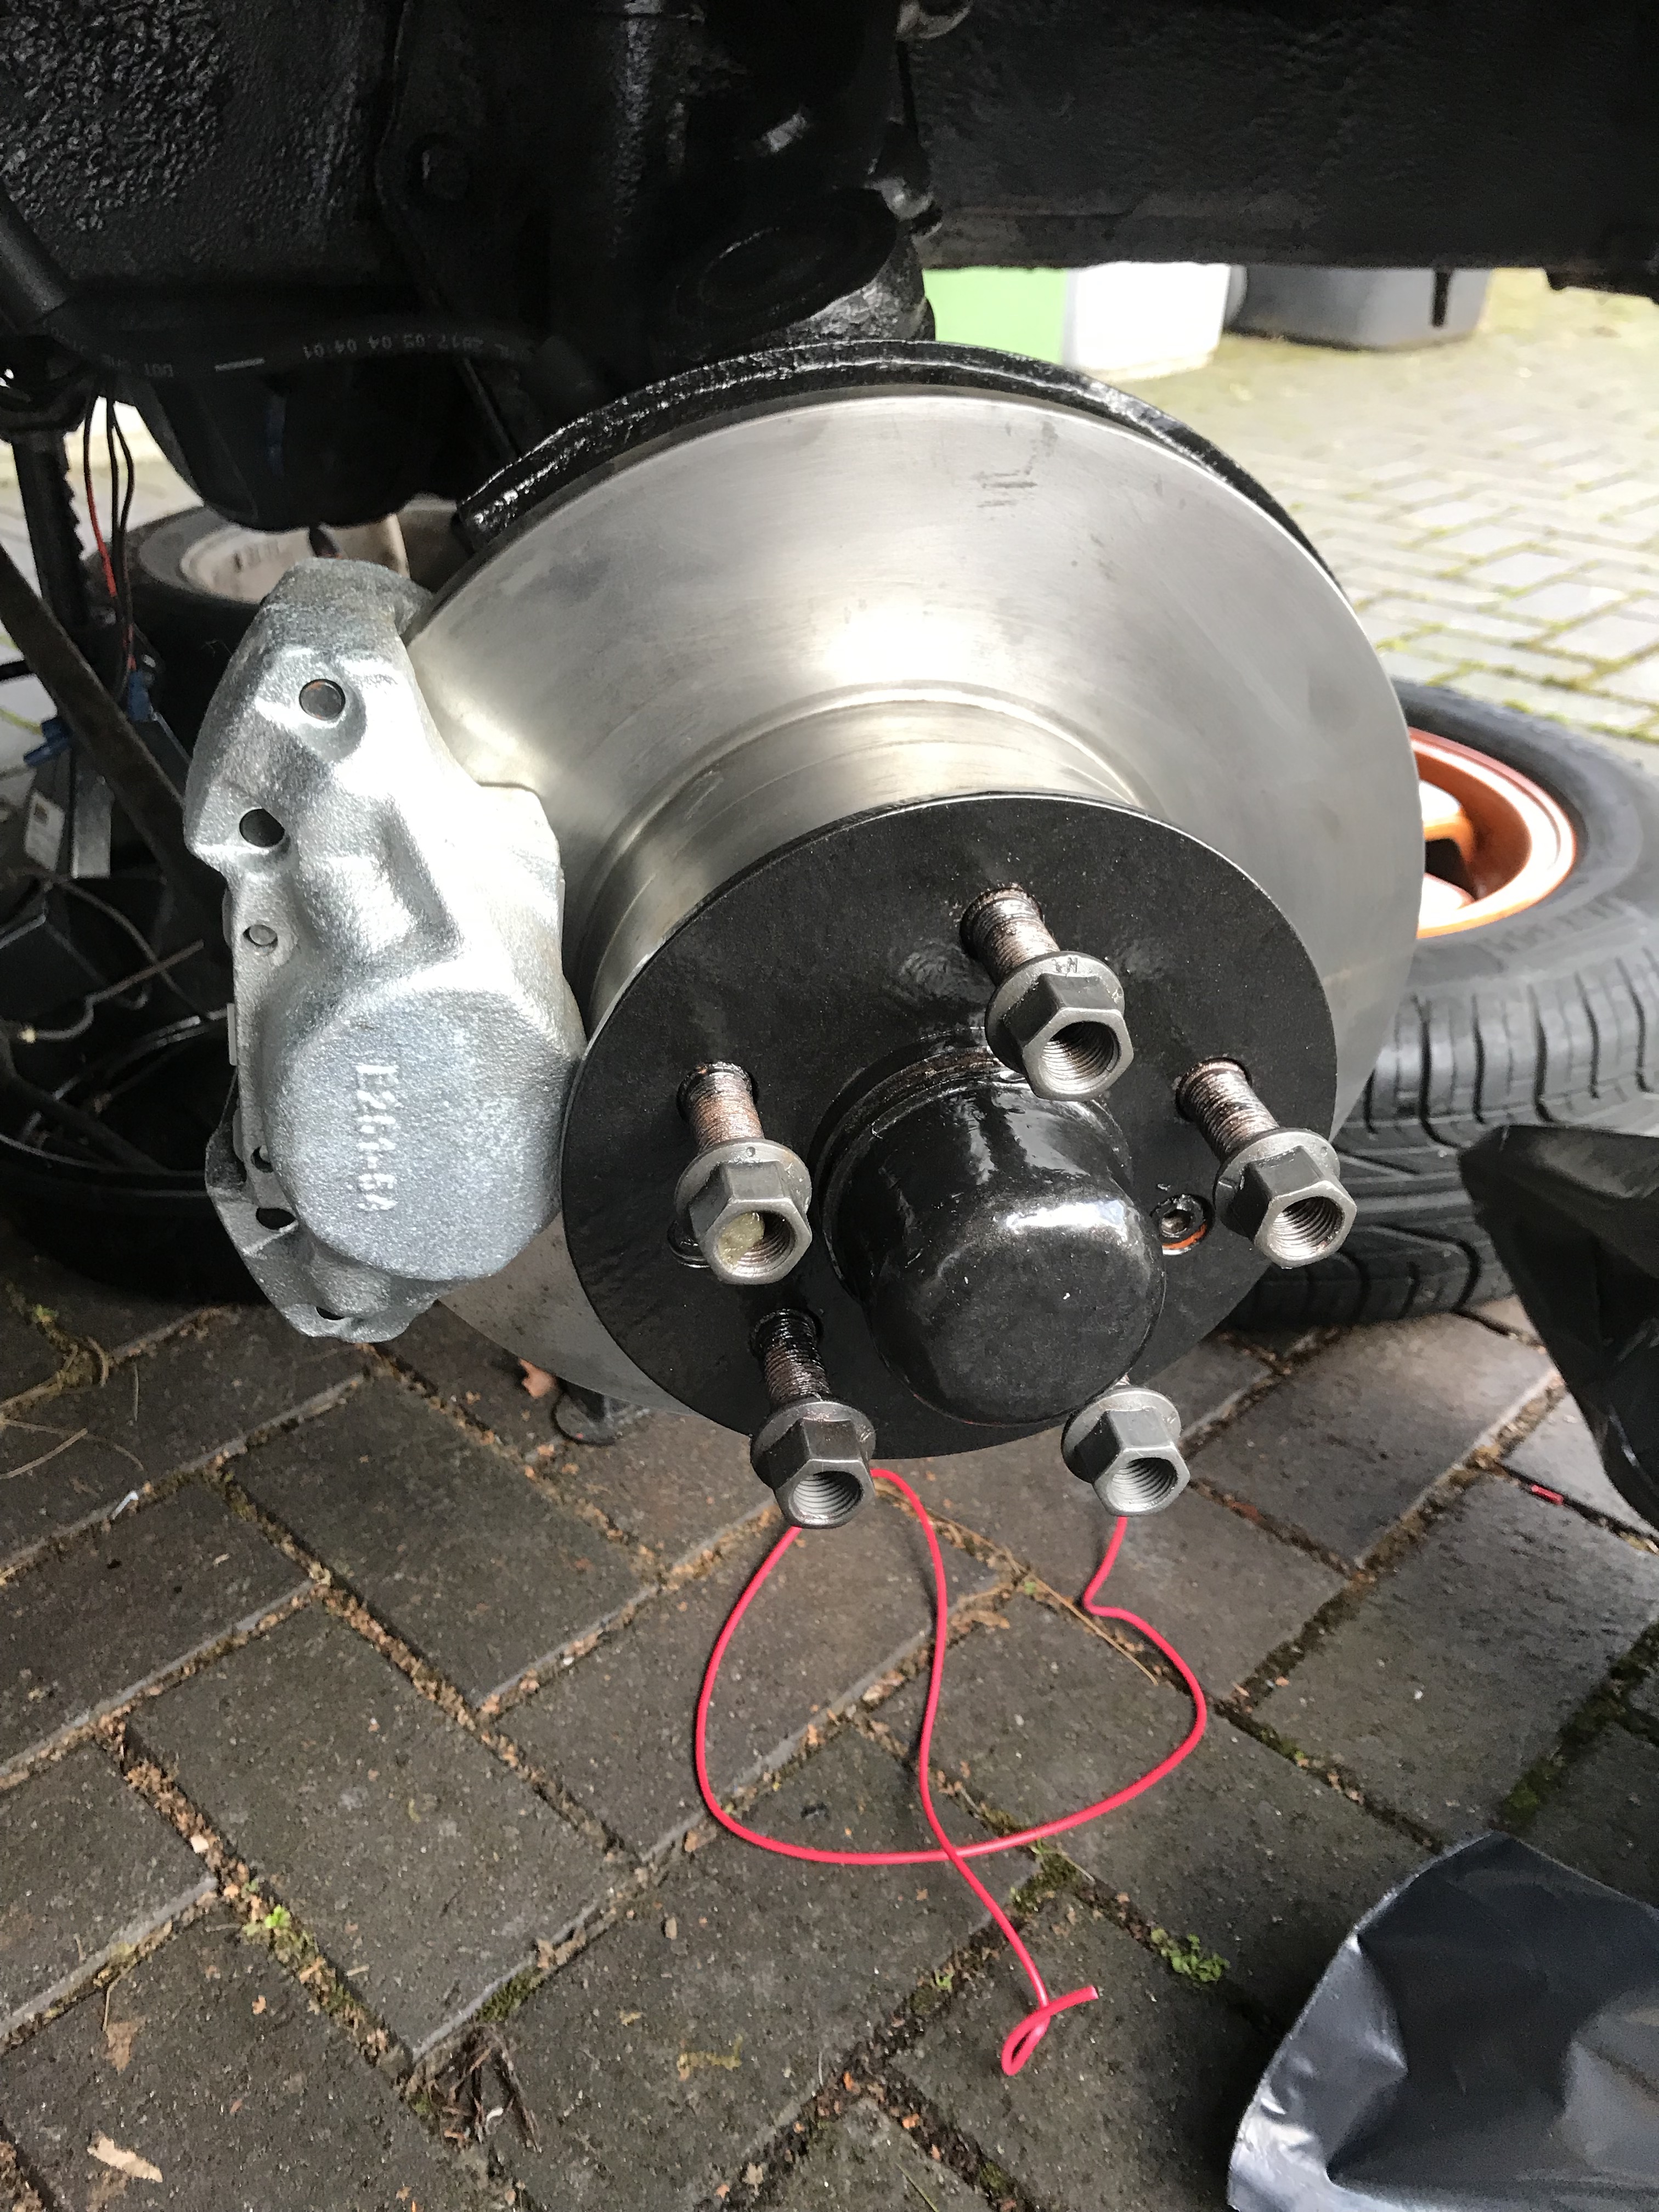
- Inspection of the front discs, some nice groves. IMHO beyond tolerance (FAULT 10).
- Front Callipers & Pads – pads had been replaced so OK, even copper grease on the anti-rattle plates. Calliper Bleed Nipples rounded off (FAULT 11). There seemed to be 2 Bleed Nipples per Calliper 1 of which was completely missing on the near-side and replaced with a bolt (FAULT 12) and one which was sheared on the off-side (FAULT 13).
- Rear Drums – I have never seen rear drums before. These were extremely corroded and looked like they had never been touched, although brake shoes were completely shot (FAULT 14).
- SO ALL IN ALL – BAD TIMES!!!!! I THOUGHT I MIGHT HAVE GOT AWAY WITH A QUICK BRAKE BLEED, NO CHANCE. WTF 14 FAULTS!
- New Plan – replace the entire braking system. Expensive remedy, but I can’t have another dead cat on my conscience.
Decided to break the whole thing down into bite size chunks. This would be first time under the van and the first time I would use a tool in anger. Having decided to replace everything (decided to leave the servo (UpDate Nov 2020 – Servo and Hose Replaced) and the balancing component in, after reading a lot online the balancing component rarely seems to go faulty and the servo had a really dodgy looking pipe connecting it to the vacuum on the engine – will test when I recondition it) it did save a lot of time in testing shot components, however prepare to make the lads at Just Kampers a tonne of cash!
- Bleed the system.
- Rip out all of the old components. Easy until I got to the rear axle nuts!
- Source new parts – see list below.
- Install front wheel components
- intall Master Cylinder and Fluid Reservoir.
- Install new pipework and hoses.
- Install rear wheel components.
- Install Handbrake components.
- Bleed system and calibrate.
- Test system – road test vehicle.
- Bleed the System: So this wasn’t really a brake bleed, more of getting rid of the old fluid. I used my jazzy new bleed kit for this (see separate section on ‘how to’.) I’ve got to say this didn’t get rid of as much fluid as I thought, there must be a better way – OPEN TO SUGGESTIONS HERE. Seemed very messy.
IDIOT WARNING: This method of removing the fluid leaves a lot of fluid in the pipes. I only realised this when I started to remove components. After emptying a sleeveful (new boiler suit now required), cleaning the driveway 7 times and looking in horror at the splash marks on our shiny new BMW I bought a 12 pack of blue roll!
2. Ripping out old components: Firstly hats off to the video’s on the the Just Kampers website. Really useful concise guide – use that and not this! Started with the front brakes, seemed easy enough with the whole process going very smoothly. Pictures below:
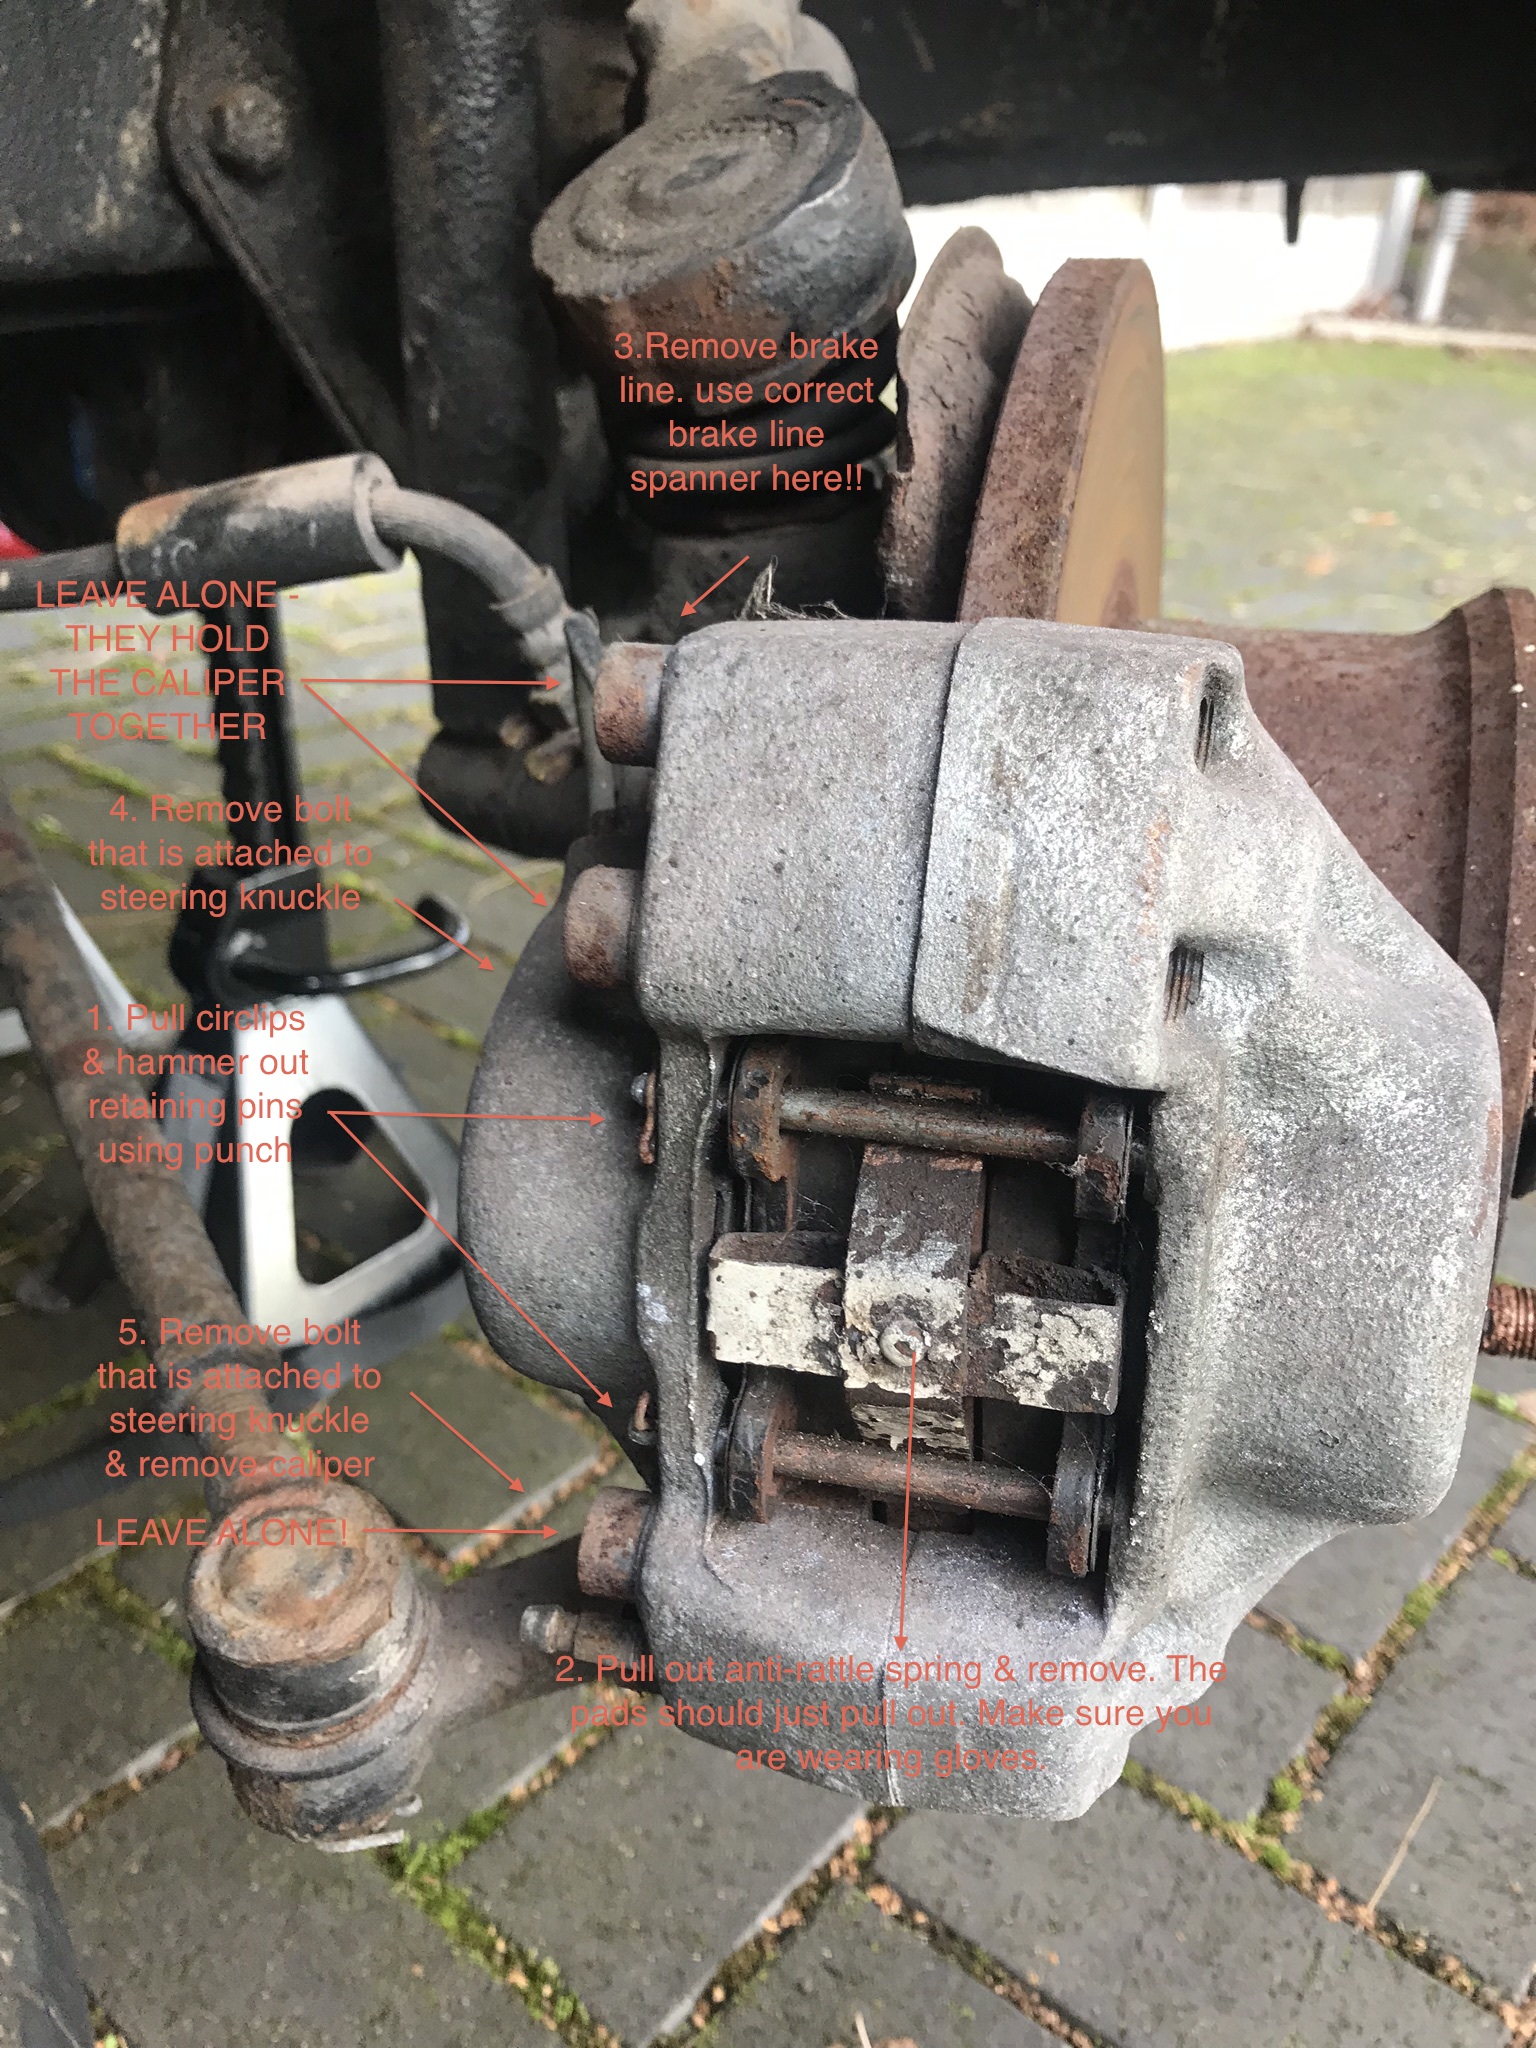

Removal of the rear brakes, was a little more tricky. Sorry folks, no pictures here as my hands were bleeding too much after trying to remove the real axle nuts! So, it takes the fella in the Just Kampers video 12 minutes to do this with an install. It took me over 2 days to get this done – nothing prepared me for the removal of the rear axle nuts! To remove the brake drum undo the 2 bolts and then continually tap the drum with a rubber mallet. On my van you can see where previous owners have got really pissed off trying to get this off as the rear backplate is distorted where a pry bar has been used. It took a while to loosen off the old rust but it does come off eventually – I aided this process with my blow torch. Also toasted a cheese & tomato butty my girlfriend had made me (its just like camping!). Once off I was presented with the rustiest wheel hub ever and what was left of the brake linings. The backplate was also completely shot, however, to remove these you have have to take off the axle nuts. This took over a day to do. Firstly, you need to order the right size socket, I got this from Sealey. I then stood on the bar and jumped around a bit – nothing. Decided I needed extra weight so grabbed my two Whippets (Bodie & Doyle) – nothing, although Doyle did fart and Bodie ran off with the remaining half of my butty. OK – bring out the blow torch – nothing. I then decided to bring on the big guns and used a 6 foot breaker bar (thanks Sealey), first nut on finally cracked – success! The nearside nut laughed at me! I then tried my shiny new Makita Impact Gun….for 15 minutes and 2 batteries, nothing! This was the Royal Marine of nuts. As a lat resort I decided that the only thing for it was the axle grinder. After carefully removing sections and reapplying the Impact Wrench it finally came off – say goodbye to 5 hours! You can now pull away the wheel hub. The next task is to remove the handbrake cable from the lever in the brake mechanism, there are special pliers for this, but just used a pair of the long nose variety, both sides came off no problem. Now, onto the 2 springs, I was replacing mine so just snipped them for ease. There should be some steady bolts and springs to remove – mine did not have them! You should now be able to remove the entire mechanism and in my case throw away, there are some tiny clips that attach the top spring to the spreader bar, keep these you can’t seem to buy them anywhere (let me know if you find them!!). Next we are onto the back plate and cylinder. Remove the brake line first, again use correct spanner if you plan to re-use. Remove the two 17mm bolts from the bottom, and the 12mm bolt from the back. Both of back bolts were rounded of, I had to drill them out, as I was replacing the cylinders I showed no mercy here. You should now be able to remove the backplate, mine was rusted on, so a little bit of ‘gentle teasing’ required. ALL DONE – IT’S BEEN EMOTIONAL!
I have found this diagram if it helps?? Have no idea what part 17 is? It was not on the old brakes and did not come with the refurb kits, if anyone out there has any idea I would love to know. DO NOT THROW AWAY PART 13!!!! THEY ARE MADE FROM UNOBTAINIUM!

IDIOT WARNING: You cannot remove the axle nuts when the vehicle is on axle stands. In my case you should also note that it is nearly impossible if you have completely removed the front brakes as every time you stand on the breaker bar the van moves forward or backwards – idiot!!!!!
3. Part List: Below is the complete list of all the parts that I bought for the job. Everything sourced from Just Kampers – thanks for all the Haribo!!!
4. Installation: Front brakes – really easy to do, the reverse of the dismantle (without the rust), nothing fancy here. The only addition to the source components, was a little bit of Hammerite to give the hubs a little bit more love (I have included the torque settings that I used for everything).

5. Master Cylinder and Reservoirs:
This was extremely painful for me, still not sure if I have really cracked it (8th December 2019). Kit list that I replaced below (Update: November 2020 – the M/C below continued to leak, this would the second of these from JK (shocking) – I have since replaced this with a very expensive M/C which seems to be holding really well):
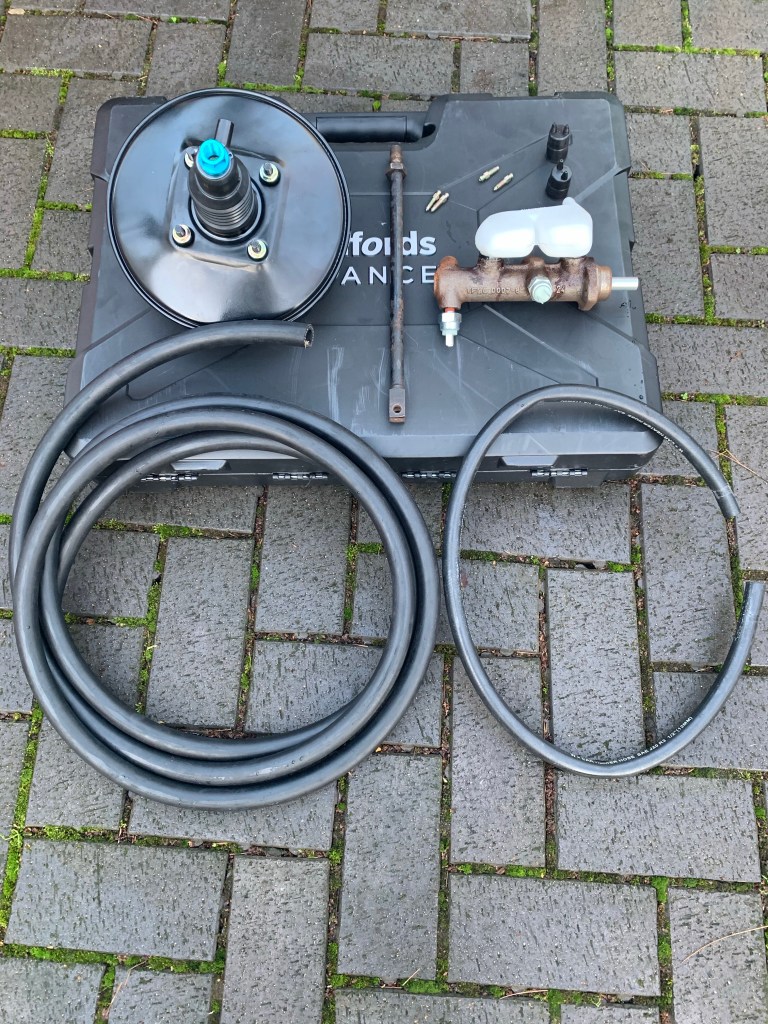
6. Pipework & Hoses: The option was simple here, I decided to replace the lot. This job is a bit of a labour of love, however, at least you have the piece of mind that it is done and more importantly you did it so you know the standard is where it should be.
7. Installation of the Rear Brakes: To make my life easier I assembled as much as I could indoors before attempting the fit on the van. The best advice you can get here after endlessly trawling the web is watch the JK video, its bob on. One thing I will mention here, however, is that the backing plates that I purchased from JK would not accommodate the star screws? I had to use a Blacksmith drill to make them larger! (Update: Nov 2020: I have since replaced almost all of the rear brake system due to component failure – I bought all parts from VW Heritage – All seem to be of a far superior quality than the ones I purchased from JK).
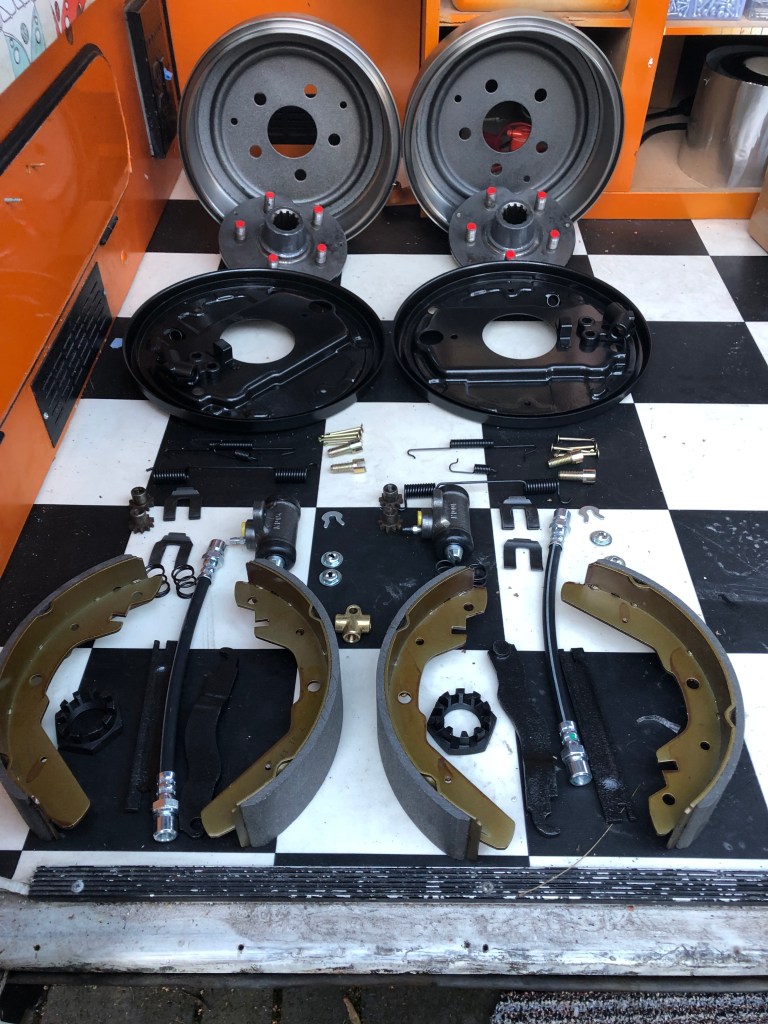
Started with the assembly below, basically the backplate connected to via the two bottom bolts and a 12mm bolt into the cylinder. Simple start!
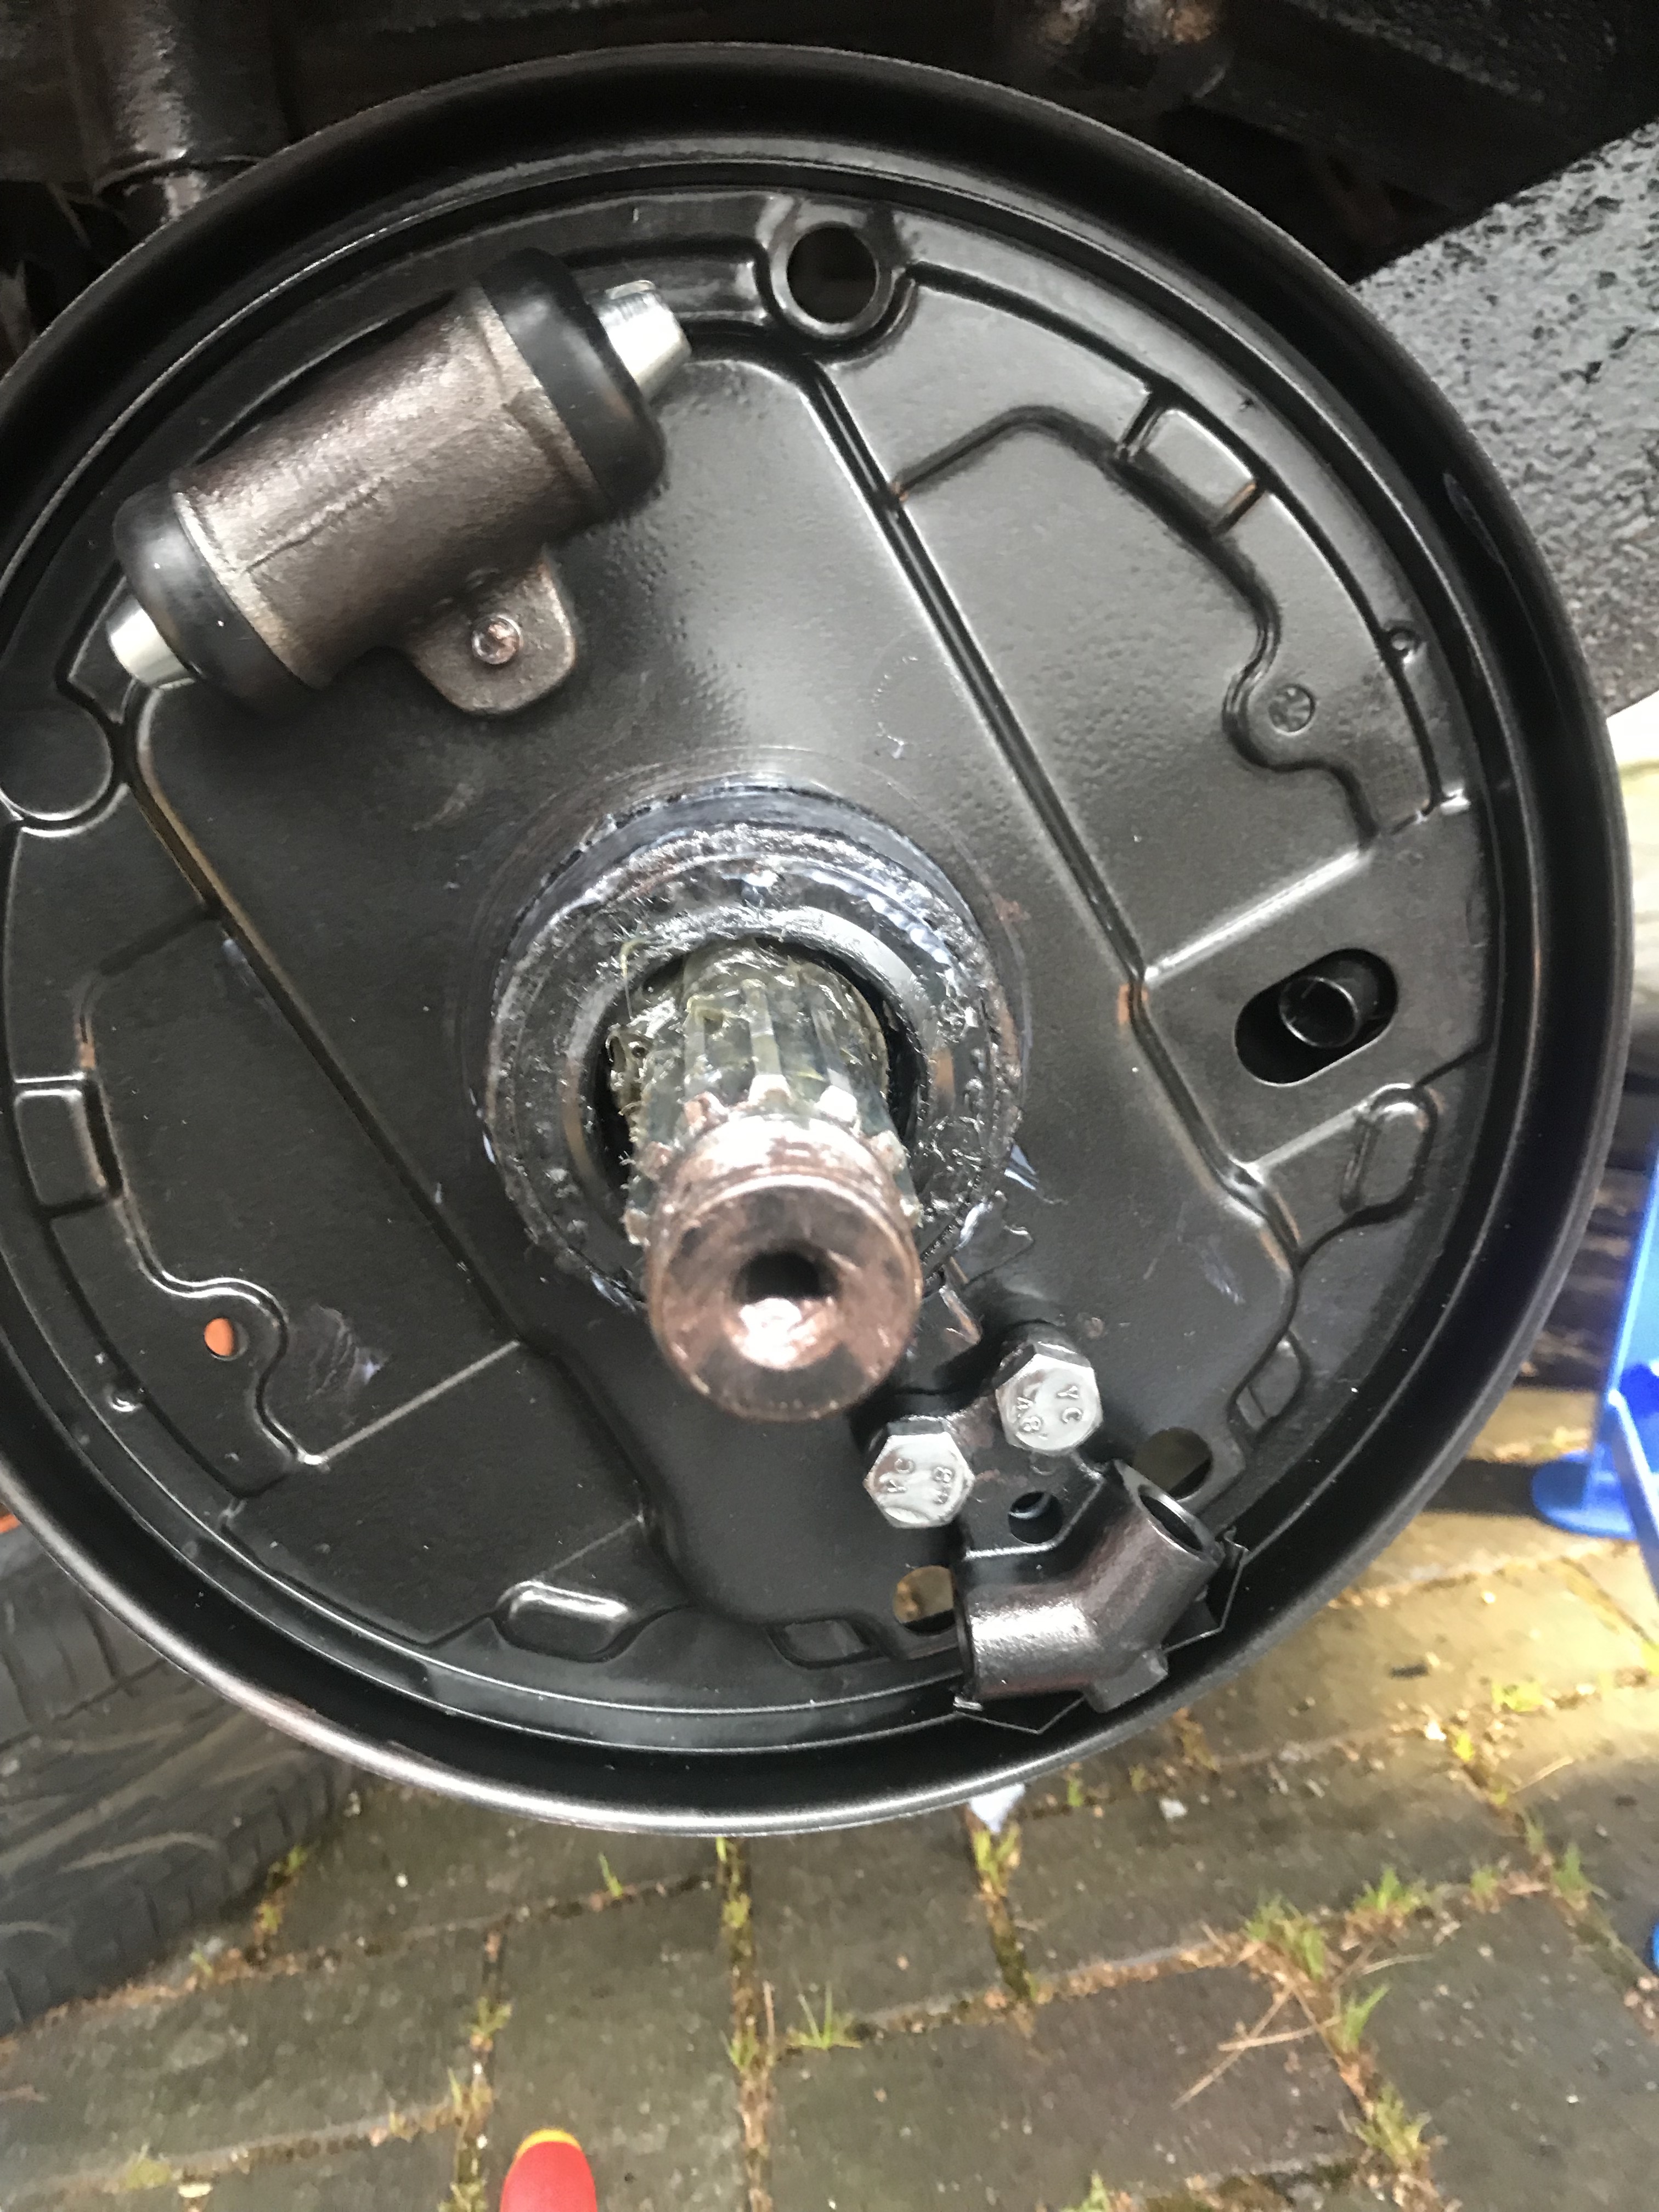
Next: Rear hub goes on after thoroughly cleaning and greasing the axle. The whole thing is then fastened into place with the axle nut at a torque of around 340Nm (a lot!).

So starting on the remainder of complete rear brake install this weekend – watch this space..
8. Brake Lines & Handbrake:
9. Brake Bleed & Calibrate:
10. Road Test:
